Beauty and Bite

Why does food just taste better outside in summer? Maybe it’s because at least here, summer is so fleeting we have to completely absorb every moment. Dining outside just seems to take on a refined vibrancy that is so appealing. It has it’s own aesthetic when compared to dining indoors, it’s everything we want to be in summer. It’s a sense of camaraderie and comfort mixed with mild abandon, the spirit of elegance with the joy of childhood.

Like lemonade with a floral kick. I adore floral flavours in almost everything from my tea or ice cream and have been meaning to make some of those cute cookies that kept popping up on my Pinterest with the edible flowers on top. Gorgeous and yum, all at once.

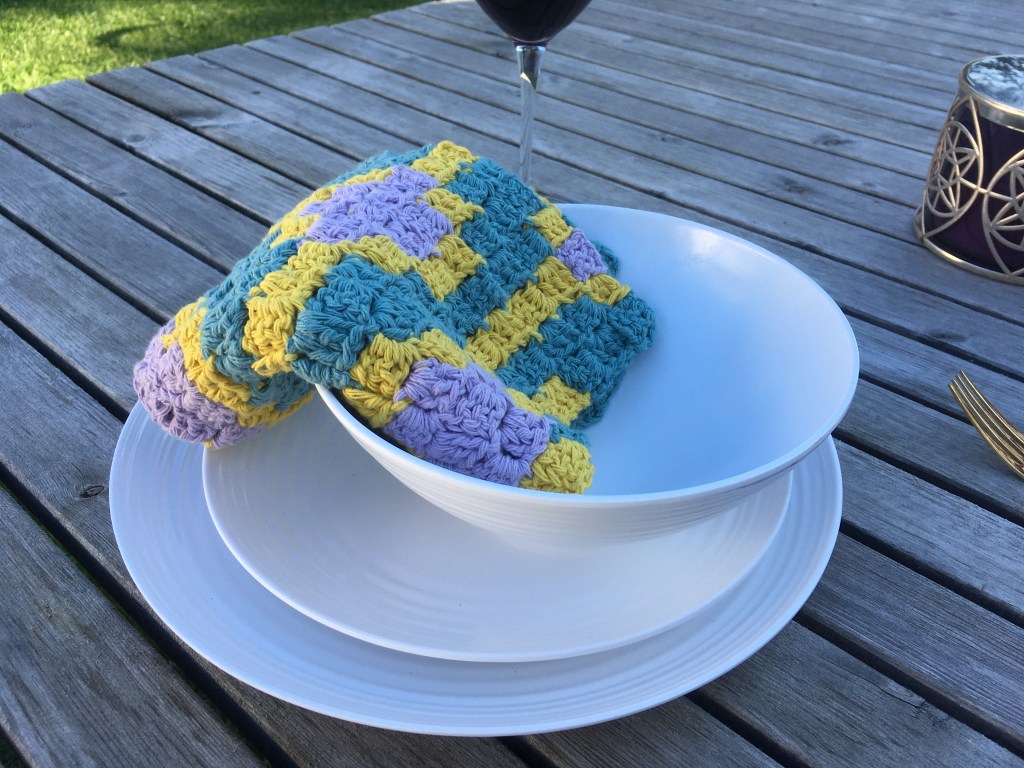
Theres no reason eating outside (yum) can’t also be gorgeous. My new Lavender Lemonade placemat hits that balance perfectly.

(Ready to get making? Skip the rest and buy the ad-free, printer friendly pattern with charts and written instructions fro both right and left-handed crocheters now on Etsy here and LoveCrafts here.)

Photos by Meggie Oxley

I’ve been wanting to make some C2C crochet placemats for awhile now and I’m so please with how it came out. To me it hits that balance between the elegance of setting an outdoor table, with the whimsy of time spent playing in the sun.

Photo by Meggie Oxley

It would be just as lovely used indoors. In fact it also reminds me of Monica and Rachel’s apartment in FRIENDS (which i may have been watching when I designed this. I swear I wasn’t influenced!). Come to think of it, doesn’t Lavender Lemonade sound like something Monica would serve?

Don’t feel like making a whole set? It would look and work great as part of a centrepiece display, or under a table lamp or plant too. Or bring a little life to the top of a night stand.

Photo by Meggie Oxley

Measuring 14″ x 11.5″, it’s large enough for place setting, and small enough to fit fit a few easily on the table (when it’s safe to have a few people over again. Stay safe folks!)

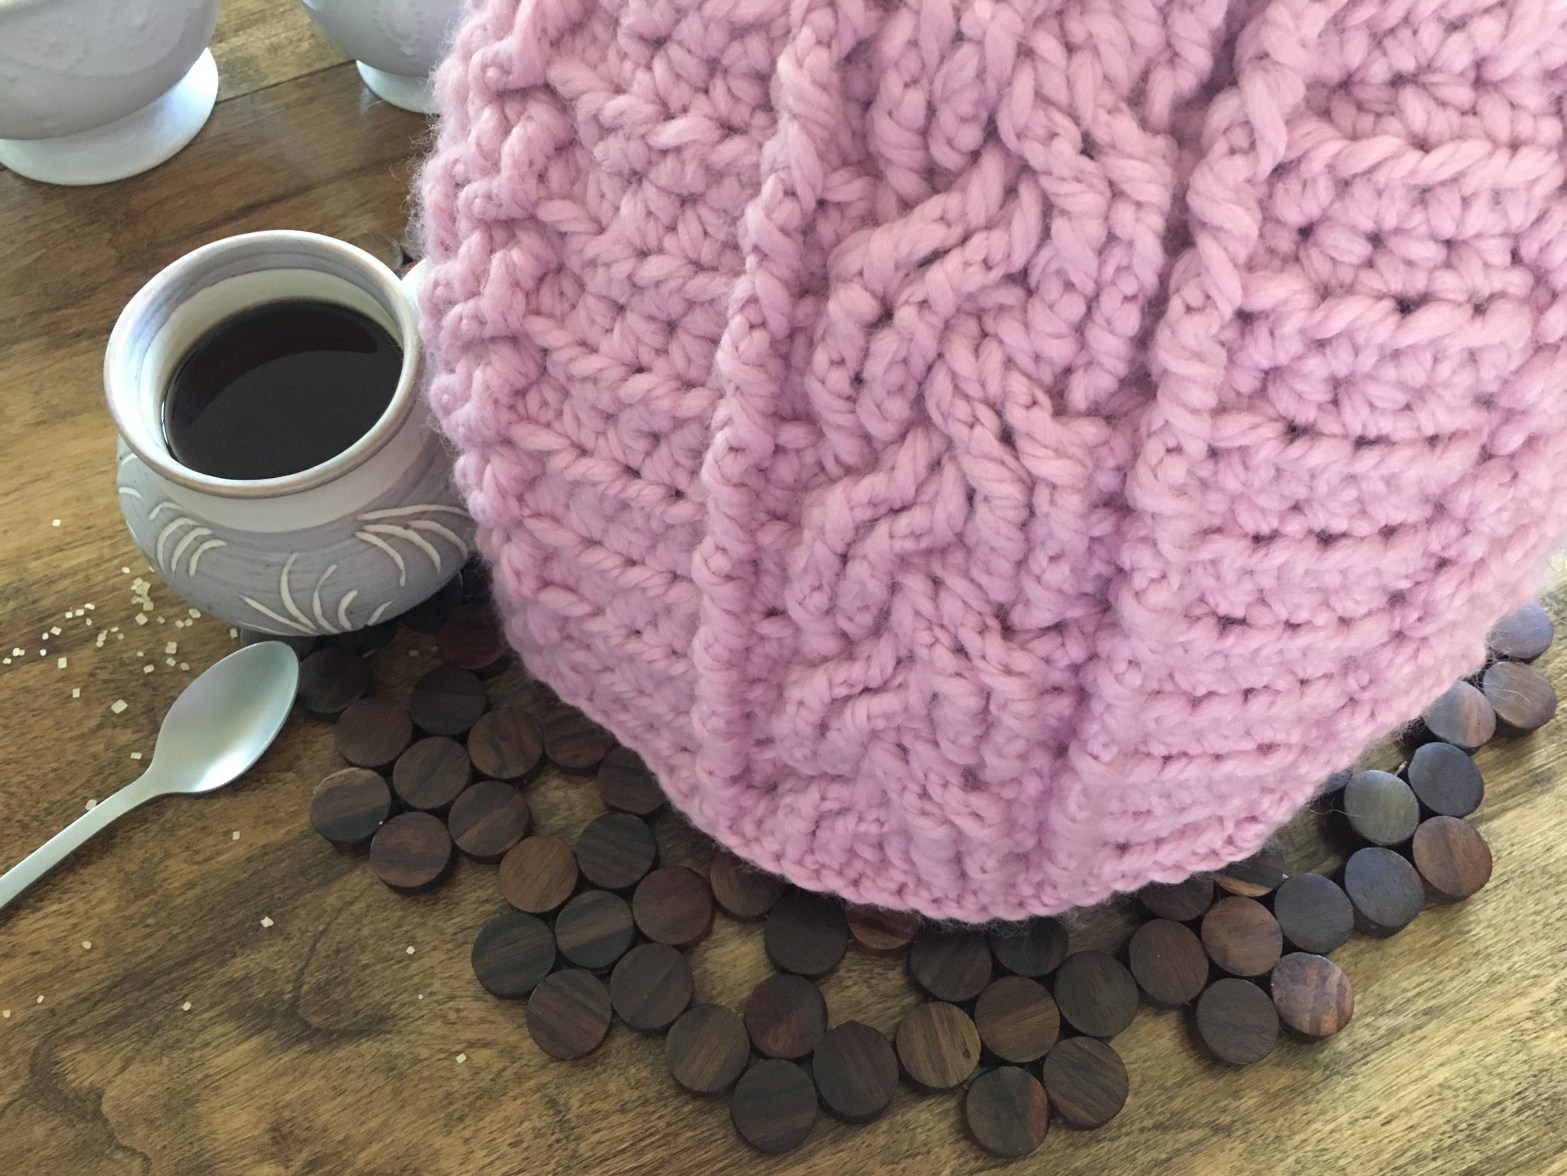
And look at that drape! I used Paintbox Yarns Recycled Cotton Worsted and even folded in quarters look how it hangs.

Photo by Meggie Oxley

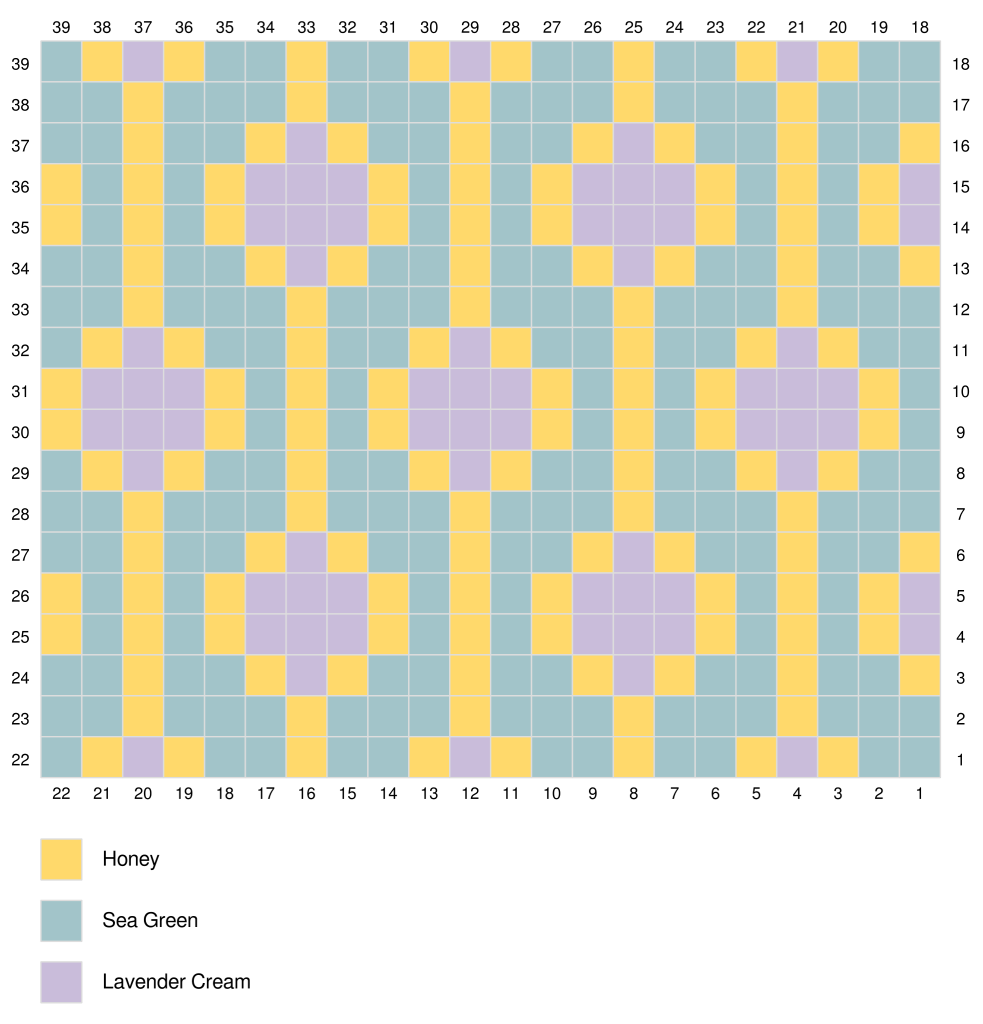
I’m including the charts below. For those that like written instructions, the ad-free printer friendly pattern is available to buy here on Etsy and here on LoveCrafts, and contains both right and left-handed versions.

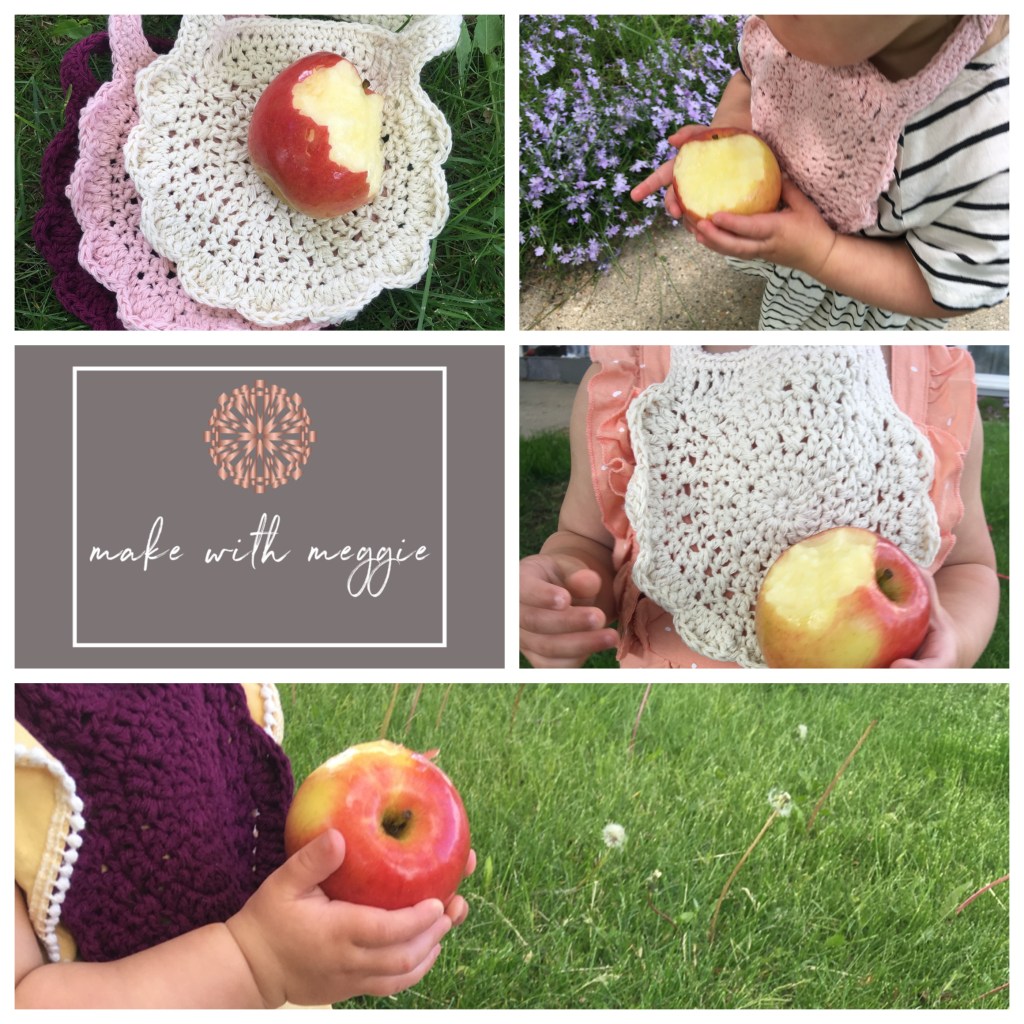
Don’t forget to post your finished pieces with #lavenderlemonadeplacemat and #makewithmeggie. Tag me (@makewithmeggie) so I can see them! I may even share it!


Materials
Yarn: 4 (worsted) weight cotton. I used Paintbox Recycled Cotton in Honey, Lavender Cream, and Sea Green
Sea Green (blue in sample) – approx 105 yards
Honey (yellow in sample) – approx 75 yards
Lavender Cream (purple in sample) – approx 50 yards

Hook: 4.5mm I like Clover Amour. Get it here, or a set with a case here. (As an Amazon Associate I earn from qualifying purchases)

Notions: scissors
needle to weave ends, I like these (As an Amazon Associate I earn from qualifying purchases.)

stitch marker to mark right side (RS) I use these. (As an Amazon Associate I earn from qualifying purchases)

Gauge
Working a 6 tile x 6 tile squad, the middle 4 tiles in each direction measure 2.5”

Size
Finished size is about 14” x 11.5”

Made of tiles of 3 dc (US terms).

Right-handed chart (keep scrolling for left-handed)

Design by Meggie of make with meggie

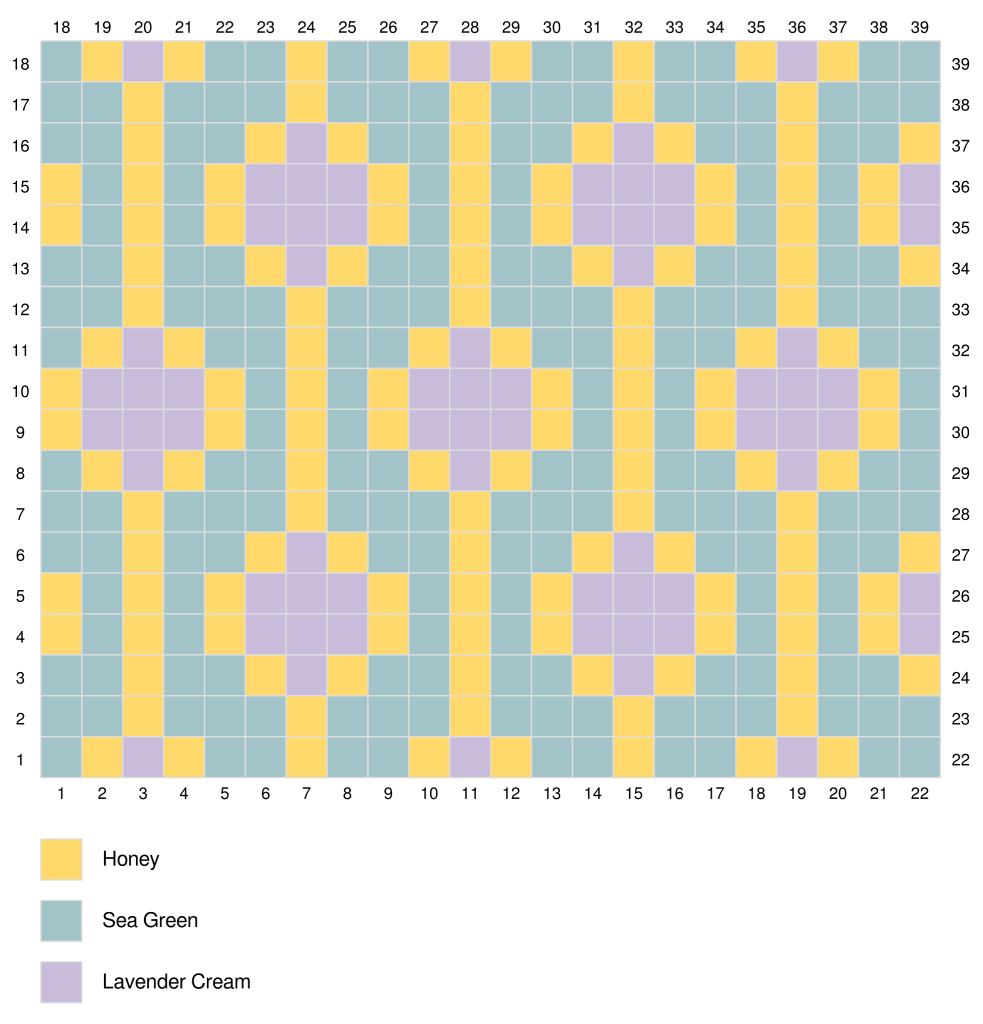
Left-handed Chart (worked from bottom left corner)

Design by Meggie of make with meggie

Finishing
Weave in ends. Block if desired.


Advertisement

Hygge just got cozier

Just after completing my first designs, I was talking about crochet with a friend who mentioned she was looking for a nice tea cozy pattern. I had looked at a lot of tea cozy patterns before and immediately knew why she’d been having trouble finding one she liked. They tend to be, well, dated. So I immediately decided to get to work on something a little more modern, but still a bit traditional since it is still a tea cozy!

I’m delighted to introduce to you the “Hygge Tea” tea cozy. It’s the chunky cabled sweater your teapot has always dreamed of. . (skip the rest and get it on LoveCrafts here or Etsy here)

Photos by Meggie Oxley

Designed to be simple, using only one colour throughout (unlike most tea cozies I’ve seen) in a super bulky yarn for ultimate cozy vibes, it will keep you in as many cups of hot tea as you can drink before you have to leave your cozy blanket to pee.

I chose Lion Brand’s Wool Ease Think n’ Quick for this project right away. Not only did I want that chunky look, but the wool content makes it an excellent choice for conserving heat. I also adore the range of colours available in this line. I designed this with a solid (or perhaps even flecked) colour in mind, but with so many beautiful variegated colourways available, if you want yours to be striped, well you do you!

This is not an advanced pattern, however it isn’t suited for new beginners either. You should be comfortable with both front and back post stitches or looking for a manageably sized project to practice them in.

If you know how to do post stitches and are new to cabling, welcome to you newest addiction! It is so satisfying to see the cabling pattern develop over the repeated rows. Just remember to check you are working in front of or behind the last two stitches made (as indicated) when going back to work in stitches previously skipped. When working in front, it will mean working down through a sort of hole or pocket. Be sure you both reach the hook down through this space and bring it up through the same space after going round the post.

The written pattern is follows here for free, but you can purchase your ad-free downloadable pdf version complete with chart and links to stitch tutorials. Click here for LoveCrafts or here for Etsy.


Materials

Yarn: 6 weight; preferably with some wool content, I used 12 oz of Lion Brand Wool- Ease Thick’n Quick in Blossom

Hook: 7mm I like Clover Amour. Get yours here. Get the set and case here. (As an Amazon Associate I earn from qualifying purchases.)

Notions: needle to weave ends, I like lacing needles like these. (As an Amazon Associate I earn from qualifying purchases.)

scissors

Gauge

not very important unless you have an unusually large or small teapot or crochet very tightly or loosely.

Mine measures 3”after the first 6 rows, and 13” across. If yours measure very different, you might want to consider a different hook size.

Size

Finished size: approx. 13” across at bottom, 10” tall (not counting hang loop)

Stitches Used: ch (chain), hdc (half double crochet), fpdc (front post double crochet), bpdc (back post double crochet), hdc2tog (half double crochet 2 together), fpdc2tog( front post double crochet 2 together), bpdc2tog (back post double crochet 2 together)

Tutorials are available on here or my youtube channel.

You will work 2 panels and then stitch them together around the top curved edge. optional instructions for a loop at the top are included.

Make sure you don’t work too tightly on the cables, it’s easy to get tense and work them tighter than you mean, or tighter than the rest of the project.

Method

ch 35
Row 1: hdc in second chain from hook, hdc across. ch1, turn (34)

Row 2: hdc 4, fpdc 4, hdc 4, fpdc, hdc, fpdc 6, hdc, fpdc, hdc 4, fpdc 4, hdc 4. ch 1, turn (34)page3image55973888

Row 3: hdc 4, sk 2, bpdc in next 2, working behind – bpdc 2 in skipped 2, hdc 4, bpdc, hdc, sk 2, bpdc in next 2, working behind – bpdc 2 in skipped 2, bpdc in next 2, hdc, bpdc, hdc 4, sk 2, bpdc in next 2, working behind – bpdc 2 in skipped 2, hdc 4. Ch 1, turn (34)

Row 4: hdc 4, fpdc 4, hdc 4, fpdc, hdc, fpdc 6, hdc, fpdc, hdc 4, fpdc 4, hdc 4. Ch 1 turn (34)

Row 5: hdc 4, sk 2, bpdc in next 2, working behind – bpdc 2 in skipped 2, hdc 4, bpdc, hdc, bpdc 2, sk 2, bpdc in next two, working in front – bpdc 2 in skipped 2, hdc, bpdc, hdc4,sk2,bpdcinnext2,workingbehind-bpdc 2inskipped2,hdc4.Ch1,turn (34)

Row 6: hdc 4, fpdc 4, hdc 4, fpdc, hdc, fpdc 6, hdc, fpdc, hdc 4, fpdc 4, hdc 4. Ch 1 turn (34)

Rows 7-10: repeat rows 3-6 (34)

Row 11: hdc2tog, hdc 2, sk 2, bpdc in next 2, working behind – bpdc 2 in skipped 2, hdc 4, bpdc, hdc, sk 2, bpdc in next 2, working behind – bpdc 2 in skipped 2, bpdc in next 2, hdc, bpdc, hdc 4, sk 2, bpdc in next 2, working behind – bpdc 2 in skipped 2, hdc 2, hdc2tog. Ch 1, turn (32)

Row 12: hdc 3, fpdc 4, hdc 4, fpdc, hdc, fpdc 6, hdc, fpdc, hdc 4, fpdc 4, hdc 3. Ch 1 turn (32)

Row 13: hdc2tog, hdc 1, sk 2, bpdc in next 2, working behind – bpdc 2 in skipped 2, hdc 4, bpdc, hdc, bpdc 2, sk 2, bpdc in next two, working in front – bpdc 2 in skipped 2, hdc, bpdc, hdc 4, sk2, bpdc 2 in next 2, working behind – bpdc 2 in skipped 2, hdc 1, hdc2tog. Ch 1, turn (30)

Row 14: hdc 2, fpdc 4, hdc 4, fpdc, hdc, fpdc 6, hdc, fpdc, hdc 4, fpdc 4, hdc 2. Ch 1, turn (30)

Row 15: hdc2tog, sk 2, bpdc in next 2, working behind – bpdc 2 in next 2, hdc 4, bpdc, hdc, sk 2, bpdc in next 2, working behind – bpdc 2 in skipped 2, bpdc in next 2, hdc, bpdc, hdc 4, sk 2, bpdc in next 2, working behind – bpdc 2 in skipped 2, hdc2tog. Ch 1, turn (28)

Row 16: hdc, fpdc2tog, fpdc 2, hdc 4, fpdc, hdc, fpdc 6, hdc, fpdc, hdc 4, fpdc 2, fpdc2tog, hdc. Ch 1, turn (26)

Row 17: hdc, sk 1, bpdc2tog, working behind – bpdc in skipped, hdc 4, bpdc, hdc, bpdc 2, sk 2, bpdc in next two, working in front – bpdc 2 in skipped 2, hdc, bpdc, hdc 4, sk 2, bpdc, working behind – bpdc2tog in skipped 2, hdc. Ch 1, turn (24)

Row 18: hdc, fpdc2tog, hdc 4, fpdc, hdc, fpdc 6, hdc, fpdc, hdc 4, fpdc2tog, hdc. Ch 1, turn (22)

Row 19: hdc2tog twice, hdc 2, bpdc, hdc, sk 2, bpdc in next 2, working behind – bpdc 2 in skipped 2, bpdc in next 2, hdc, bpdc, hdc 2, hdc2tog twice. Ch 1, turn (18)

Row 20: hdc2tog twice, fpdc, hdc, fpdc 6, hdc, fpdc, hdc2tog twice. (14) Finish off.

Finishing

Weave in ends.

Stitch panels together, making sure both right sides face out.

Optional hang loop: Stop stitching in middle of top [slst, ch 10, slst] before continuing to stitch around


Eat your heart out

Photos by Meggie Oxley

To get your ad-free printer friendly copy of this pattern with direct links to each stitch tutorial on LoveCrafts click here. From Etsy click here. Keep scrolling for the free version.

At our house, apples are a favorite with our youngest (O). She will nibble on a whole one all afternoon until it’s gone, often the core too! While her father and I love her enthusiasm for fruit, I don’t love the brown stains on her clothes from the apple juice dribbling down her chin. The solution? A bib of course. Which since it’s used for a good part of the afternoon, specifically because of her apples, we refer to as apple bibs here.

Photo by Meggie Oxley

I used some hand-me-down-from-big-brother (little A) drool catcher bandanas for a while. And they’re cute. But since she often spends so much time with one on, I of course wanted some cute, girly ones that would look great with her clothes. So I had to make some.

I love vintage inspiration. I love lace. I love texture. A bib can only have so many holes of a certain size before its not practical, so I went for subtle texture changes while keeping the fabric ‘dense’ enough to still function as a bib. I also couldn’t resist adding some cute petals to give a little more shape and a hint of ruffle, and the little curl on the edges of them give just a bit of pop.

I have recently discovered Paintbox yarns recycled cotton. It’s worsted weight and comes in a beautiful, easy to coordinate range of colours. It’s more flexible and has more drape than some other cotton yarns I have used making a wonderfully flexible fabric that is not stiff or bulky at all.

I plan on giving this yarn it’s own post later, you’ll also find it as my yarn of choice for some other upcoming patterns. I don’t want to end up repeating myself too much but I will say it washes very well! The jam coloured bib was washed on a sanitary (hot!!!) cycle with our dishtowels before I had a chance to test it for dye run and nothing came out a different colour than it went in. It went in the dryer after that (again hot) and although maybe a bit crumpled it still measures 7″ across the widest point as it did when I just made it. I have to say I’m quite impressed!

Photo by Meggie Oxley

I love making pieces without having to break yarn and reattach whenever possible and I’m happy to say I accomplished that here. The bib is made from a total of 9 round, 7 joined, the last 2 continuous.

This bib will fit from newborn to toddler. I like using the large plastic snaps like the ones on cloth diapers, but a button will do fine as well. If the straps seem to long, simply add more snaps or an extra button to make it adjustable. This fits quite well on O who is one and a half next week (I’m not crying, you’re crying!) and it definitely would have fit her well a while ago too, so extra fasteners are likely only necessary if you intend to use it as a spit up or drool catcher for awhile before foods. Neck openings on bibs always look so small to me but I actually did it up around my own neck and it wasn’t uncomfortable. If you are doing it for a larger child, you may want slightly longer straps simply so it sits lower down, but I probably would add no more than 5 chains and stitches to each tie.

The free pattern is below, to get that downloadable ad-free printer friendly pdf here’s the links again for LoveCrafts and Etsy.

Share your finished piece with me! Use #makewithmeggie and/or #appleblossombib and don’t forget to like, share, comment and subscribe!


Materials

Yarn: 4 weight (worsted) cotton. I used Paintbox Recycled Cotton in Jam, Peachy and String. Skeins are 3.5 oz, you will need less than 1.8oz to make one bib.


Hook: 5mm (H) I like Clover Amour. Get it here, or get the set with a case here. (As an Amazon Associate I earn from qualifying purchases.)

Notions: scissors

needle to weave ends. I like these lacing needles. (As an Amazon Associate I earn from qualifying purchases.)


Option 1: snaps (I used the large plastic snaps for cloth diapers) and snap installer appropriate for snaps being used

Get a kit with tons of snaps and everything to install them here. (As an Amazon Associate I earn from qualifying purchases.)


Option 2: one 1/2”- 3/4’ diameter button (I find ones with printed designs on them tend to lose the designs in the wash, especially on wood buttons

Gauge: Measures approx. 2 1/4” across after first three rounds

Stitches Used: magic circle, ch (chain), sc (single crochet), slst (slipstitch), hdc (half double crochet), dc (double crochet), sk (skip) , trc (triple crochet), fpdc (front post double crochet), bpdc (back post double crochet

US terms used throughout. Do not count turning chains. Tutorials available here and on YouTube

Method

Round 1: Sc 8 in magic circle. Join, ch 2. (8)

Round 2: 2 dc in each stitch around. Join, ch 1. (16)


Round 3: [hdc, 2 hdc in next] around. Join, ch 2. (24)


Round 4: [sk 1, dc in next, dc in skipped stitch, 2 dc in next] around. Join, ch 2. (32)


Round 5: [dc 3, 2 dc in next] around. Join, ch 2. (40)


Round 6: [sk 1, dc, dc in skipped, sk 1, dc, dc in skipped, 2 dc in next] around. Join, ch 1. (48)


Round 7: [hdc 5, 2 hdc in next] around. Join, ch 3. (56)


Round 8: trc 3, dc 2, hdc, sc 8, hdc, dc 2, trc 3, ch 20. Sc in second from hook, sc 18 in
back ridges. Sc 2 in side of trc and sc 1 in same stitch as trc. [2 dc in next, 2 trc in next, 2 dc in next, sc in next] 9x, make sure not to work in joining slst of Round 7. Sc 2 in side of trc, enclosing turning chain beside trc. Ch 20, sc in second from hook, sc 18 in back ridges.

Round 9: Sc across top of neck (20) and up and down both sides of neck tie and next 3 sc being sure to work 2 sc in end of tie. When you reach the first dc, [fpdc 2, fptrc 2, fpdc 2, slst] 8x, fpdc 2, fptrc, fpdc 2, sc 3. Sc around tie, working 2 in end and skipping last stitch of tie. Slst in first sc of top of neck (this pulls the tie to a better angle). Finish off.

Finishing

Weave ends.

Option 1: Follow instructions for your chosen snaps to attach snaps at end of ties. Make sure you use opposing snap pieces and that you will be able to close it without twisting one tie.

Option 2: Sew button at end of one tie on top . Join yarn at end of other tie and ch until just long enough to fit over button when folded into a loop. Slst in same place you joined. Break yarn, weave ends.


Sparkle and shine

Our dishwasher is broken. Has been for months. It’s fair to say I do a lot of dishes having a family of 4 and I’d like to be able to claim expert status!

One obvious thing that makes them harder to do is not having enough dish cloths. I always grab a clean one in the morning and it hangs (rinsed) on a hook near the sink after each use to let it dry. By morning, it’s dry and I throw it in the kitchen laundry pile when I grab the fresh one. No stinky cloths, and no mold waiting for a decent enough sized laundry pile.

Of course this system only works well if you can make it through the week, and that wasn’t happening with the 4 or so we had left. So I came up with something. Actually, I came up with 5 somethings.

Photos by Meggie Oxley

I’ll admit I’ve had some crochet dish cloths before over the years made by various people. Some were great, some less so. I hate holes in them. Whether part of the original design, or because they’ve stretched. So right away I knew I wanted to make a fairly tight fabric. but I also didn’t want them to be stiff or difficult to manipulate into small corners.

Alternating stripes of two different textures give the best of both worlds for the washcloth. The first, a row of dc banded on each side by a row of sc to anchor and give the dc stability allow for more movement and flex in the cloth, softening it. The other, a section of basic crunch stitch (alternating sc and dc) provide the desired density and scrubbing power.

Photo by Meggie Oxley

It’s an ideal cloth for the face/shower too.

But why stop there? Sometimes you want just a bit more scrub. Ever washed the Mac and cheese pot the next day? Red Heart makes a Scrubby yarn that is fantastic. I thought why not use one strand of it held together with one of cotton, and reduced the size to make working with a slightly thicker cloth more manageable and the scrubby cloth is now usually the first I grab from the drawer. I use the actual scrub brush way less when I use this cloth. It’s that good. Rows of crossed dc help add flexibility without making large holes here. Rows of hdc work up “solid” cloth in between quickly. When made in Paintbox recycled cotton, it’s unbelievably soft and flexible when wet while maintaining its extra scrub power.

Photo by Meggie Oxley

This would also be great for gentle daily exfoliation in the shower.

I have recently discovered Paintbox yarns recycled cotton. It’s worsted weight and comes in a beautiful, easy to coordinate range of colours. It’s more flexible with more drape than other cotton yarns I have used, making a wonderfully flexible fabric that is not stiff or bulky at all.

Photo by Meggie Oxley

The other three cloths in this patten suite are smaller, but also effective. There’s the scrub pad, made using only the Scrubby yarn. Very durable, you can really get at the stubborn stuff. I have even removed crayon from the wall using only this cloth and a bit of water.

The small bordered cloth is great for any small quick washes. Like that coffee cup you need a few minutes ago. It’s also great for wiping up little faces and hands after a meal and the perfect size for a washable, reusable makeup remover.

The last (but of course not least) is the small loopy cloth. It has the ability to get into those weird shapes that are hard to get or make a lovely lather in the shower.

I’ve decided to release the pattern for the wash cloth for free, you’ll find it below.

For those wanting to make any of the others, or a complete set, you can buy the complete downloadable pdf on LoveCrafts here or Etsy here.

The complete pattern set is printer-friendly and includes links taking you directly to stitch tutorials on YouTube as well as charts for the Wash Cloth and Scrubbie Cloth.

Have a great time making! Leave me a comment to let me know how you did. I’d also love to see your finished pieces! Use #makewithmeggie and #getcleansuite.


Wash Cloth

Yarn: 4 weight (worsted) cotton

Hook: 5mm (H) – I like clover Amour. Get it here. Or get the whole set here. (As an Amazon Associate I earn from qualifying purchases.)

Finished size: 7” x 8”

Gauge: not important

Stitches Used: ch (chain), sc (single crochet), dc (double crochet)

You should have 26 stitches per row throughout the pattern. Written only occasionally in pattern as reminders.

ch 27 leaving tail about 11” (27cm) long

Row 1: sc in second chain from hook. sc across. ch 2, turn (26)

Row 2: dc across. ch1, turn

Row 3: sc across. ch1 turn

Rows 4-8: [sc, dc] repeat across. ch1 turn (13 [sc, dc] per row)

Row 9: sc across. ch 2, turn Row 10: dc across. ch 1, turn

Row 11: sc across. ch 1, turn

Rows 12-16: repeat rows 4-8

Rows 17-19: repeat rows 9-11

Rows 20-24: repeat rows 4-8

Rows 25-27: repeat rows 9-11 (26)

Finish off leaving 11” (27cm) tail. Weave ends under entire first and last rows to ensure they stay over many uses and washes.