Just in time for sweater weather…

My second feature day in the Relax and Hook blog hop hosted by Deanne of Small But Kinda Mighty is here (be sure to check back in on her site daily for the next patterns)! I am so excited to share with you another customer favourite pattern, the Breezy Days girls pullover, FREE all day today, September 19, 2022. All you need to do is grab the code at the end of this post and use it to checkout in my Pay Hip store. Using one of the links in this post will take you directly to the right listing!

The ebook containing all 30 patterns that will be in the blog hop, plus 10 more patterns and other bonus content is still available through the end of September too. So if you’ve missed some of the free patterns, this is the way to get an amazing deal on them. To buy all the patterns individually would cost nearly CAD$220, while the ebook is just CAD$24.99! It’s a great way to show support for 20 woman owned small businesses, and when you buy it using one of my links, it will help support mine directly with a commission.

Deanne is also interviewing me on YouTube live at 11am MST. Watch it here! If you prefer Facebook live, you can watch it here!

a collage of photos of two girls wearing the breezy days pullover. One in light pink one in seafood.They pose in various places around a red brick house, wooden gazebo and black metal trellised garden arch covered in bright pink flowers.
Photos by MAK

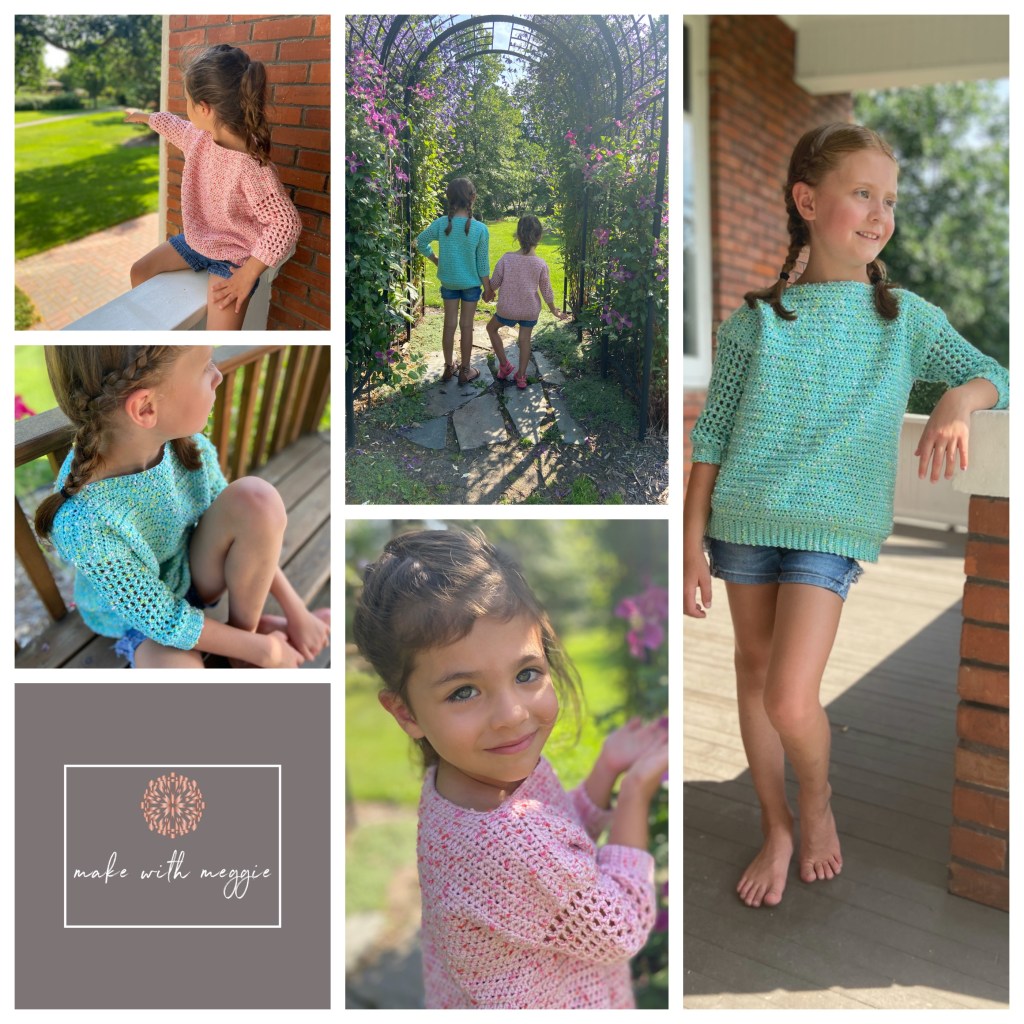
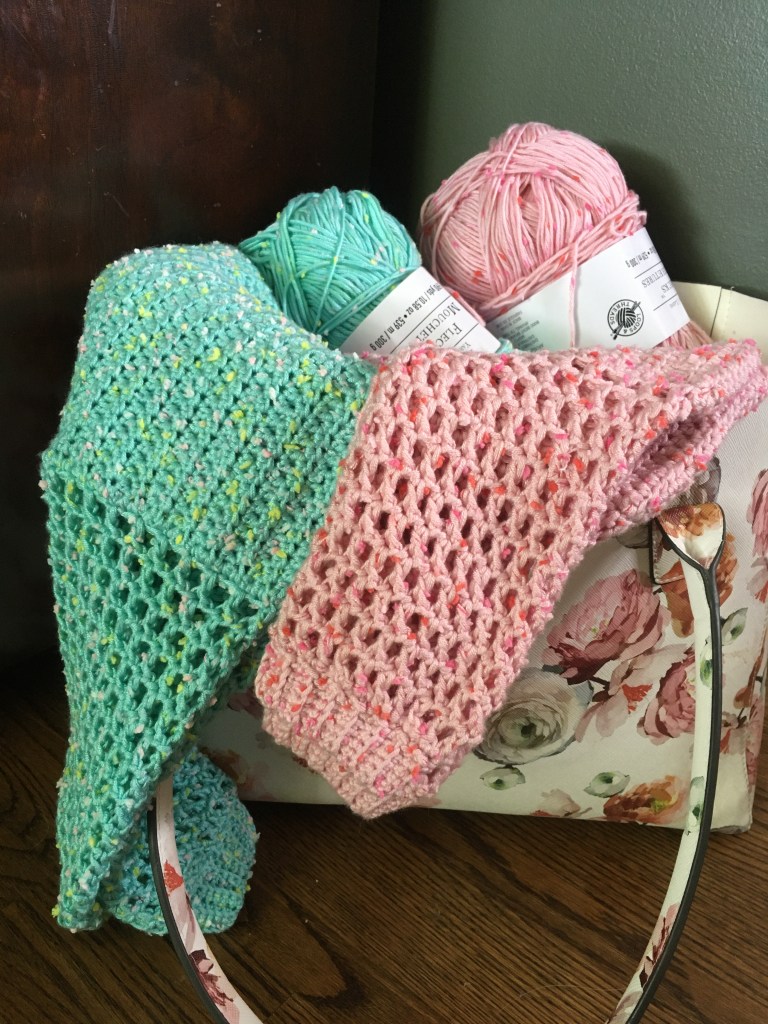
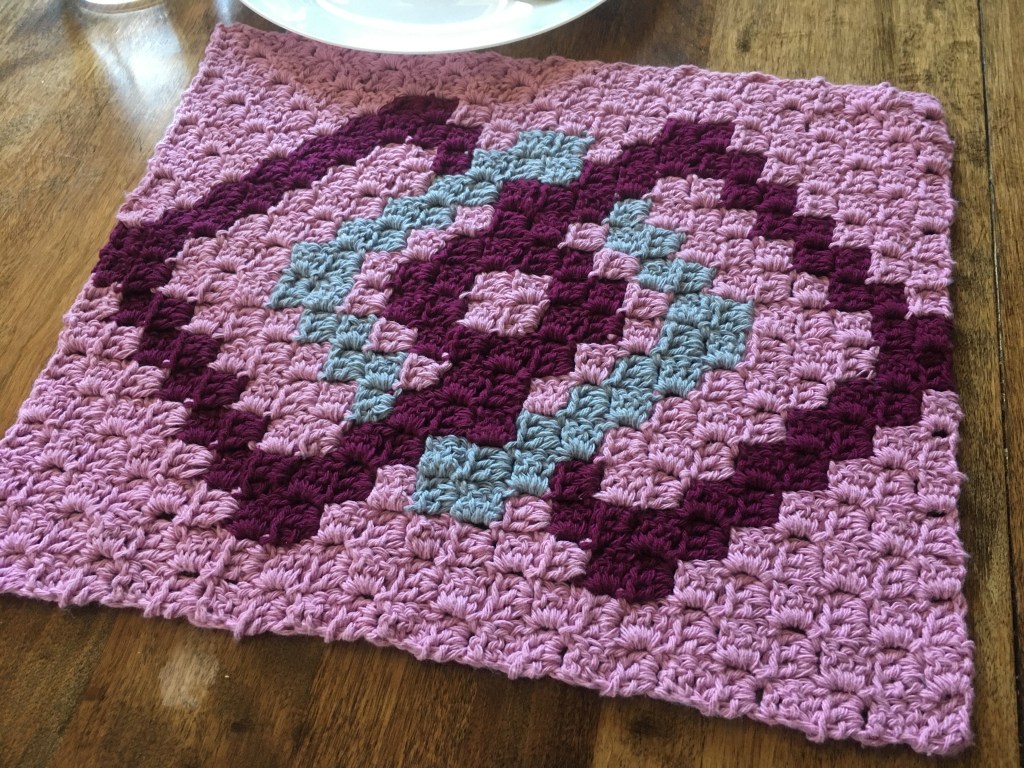
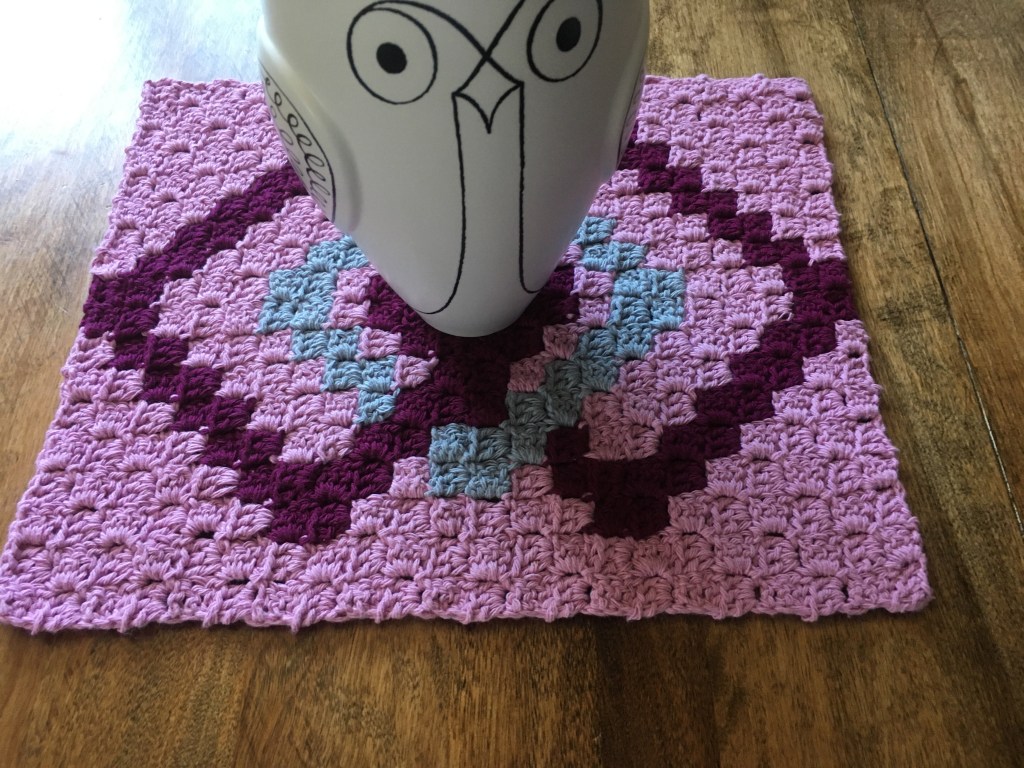
Summer days may be almost gone, but at least here that means more wind, and the official start of sweater weather. This comfy, relaxed fit sweater is perfect not only on cooler summer days but in fall, and as a layer as the temps continue to drop. It also makes a simple yet smart top for winter days indoors. And it makes up in no time thanks to the simple stitches and almost no seaming, I even had a total of 2 ends to weave in at the end. Make children’s sizes 1.5/2, 3/4, 5/6, 7/8, or 9/10. Hello matching sibling sets!

I’ve made three of this sweater so far, and have another on my to do list with the yarn ready and waiting as my daughter has almost outgrown her first one! You can get as fancy or as simple with your yarn choices as you like, I just recommend choosing one that will give great drape when worked to gauge. It’s all about the relaxed oversized fit, which as a bonus, will change but still look great as the child grows. Get longer wear out of your work!

two girls wearing the breezy days pullovers in pink and seafoam sit o the bench of a wooden gazebo with gardens behind them, looking at the camera with an arm around each other
Photo by MAK

The two links below will take you to the pattern listing in my pay hip store where you can use the code MINDFULCROCHET to get the premium PDF download for FREE, or to where you can buy the entire ebook! If you decide to buy the ebook at a later date (don’t wait long, it’s only available through September), please consider coming back to use my link as I will receive a commission when you do, at no cost to you.


It’s Blog Hop Time!!

Updated Sept 12, 2022:

Discount code has expired, and the pattern is no longer free. It is available to purchase for regular price of $CAD 2.50 (you can still use the links to my Payhip and other stores here), and also part of the ebook mentioned below at the same great deal it was yesterday. Thanks to everyone who downloaded the pattern, I hope you enjoy it! See you again on my next feature day with another pattern.

Today’s the day folks! Keep reading and scrolling for the special code because the Foothills Hat, the first of my two patterns featured in the Relax and Hook blog hop hosted by Deanne of Small But Kinda Mighty, is FREE, that’s right, FREE all day. (Reminder: expired code) The full ad-free, printer friendly PDF downloadable version. And don’t forget you can get the entire e-book containing not only all the patterns being featured this September, but 40 mindful crochet patterns and some bonus material. Nearly $CAD 220 of patterns for $CAD 24.99 is an amazing deal! If you use one of the links (I’ve given you one above already, and another at the end!) on this page, I’ll even get a commission at no extra cost to you whatsoever! So thanks!

Two of the Foothills Hat, one in pink with a folded brim and taupe faux fur pom-pom and one in navy blue rest together on a white faux fur background. the picture is on background of taupe with exposed an exposed edge of each cardboard and white paper visible at a small angle across the middle. Near the bottom black text reads foothills hat by make with meggie.

I hope you’ve been having a great time hopping around getting all the fantastic patterns featured so far. I’m so excited you’ll be adding this one to your collection. It’s been one of my customer favourites and is just in time for the cold season (unless you’re joining us from the Southern hemisphere. Sorry, it’s winter prep mode here!).

This is one I’ve made sooooooo many times myself as it truly makes a great gift. It can be made to suit anybody’s taste. Fold up the brim a lot, or a little, or not at all. Wear it close like a beanie, or slouchy and relaxed. One solid colour, color block (in the one below, I changed colours in the same place in the middle of every row), or variegated. Faux fur pom-pom, classic pom-pom, or no pom-pom. It’s completely unisex and customizable!

A two toned version of the foothills hat with a folded brim. The top of the hat is a mushroomy beige and the bottom is burgundy.

The button below will take you straight to the listing in my Payhip store where you can use to download your copy. As always, I’d love to see your projects, so tag me @makewithmeggie in any posts. You can add @foothillshat as well.

Paid Foothills Hat pattern available in my Payhip, LoveCrafts and Etsy shops.

Friendly reminder that I see a portion of the proceeds for all e-book purchases made from one of my provided links. So if you decide at a later date to purchase this amazing deal, please consider using one of the links here.

Share the love

Hey all, it’s been awhile. I hope you’re all through your busy making time of year and are ready to make something for yourself now!

In all honesty, that’s what I’ve been doing over here recently and that’s good news, because I’m getting all kinds of new ideas to play with to make exciting new patterns for you. It’s amazing how often the best ideas come when you Arne tryin g to come up with the best ideas.

Staying warm is always on my list of best ideas however and let me tell you it is getting COLD over here. Maybe not as cold as a typical winter, but this is about the time of year we get a colder-than-the-rest-of-winter-you-already-thought-you-were-tired-of snap.

So this makes it the perfect time to make yourself (or someone else, I won’t judge you for being a giving person!) a cozy hat and mitts set.

You probably saw this part coming…. I’ve got the perfect set for you!

Photo by Meggie Oxley

Meet the Sparks Fly hat and mitts set. Full of chunky goodness, it takes cabling technique and twists it (or rather takes the twist out of it) into a modern textures zig zag.

I find it a gender neutral style. It would be quite striking in a deeper heathered tone. Or, for those with tastes more like mine, a softer flecked tone (with pink of course!) and a large pom-pom (have I told you I like pink?) looks great too!

Photo by Meggie Oxley

I’m going to keep this post pretty short because here’s the super exciting part (as if you weren’t excited already…), I’ve written all about this pattern as a guest post for Desamour Designs blog and the entire pattern is posted for FREE at the end of the post (please do read your way to down to it, there lots of good info and pretty pictures to make it worth your while)!

That’s right. Free. I still have a paid PDF version available that is easy to print and as always, contains links to my video stitch tutorials. It’s also left-handed crocheter friendly with extra tips for success.

As always, you can find the downloadable version on my LoveCrafts and Etsy shops.

Even if you’re buying a your copy (thank you!), I recommending heading on over to post on Desamour Designs for the read!

Happy crocheting, and stay warm!

Photo by Meggie Oxley

Cuddlier than your tree

I’ve been little MIA around here recently. But I’m back now! I still managed to release a couple more patterns in that time, and I plan on catching up with post about them soon. But today’s post is for my newest pattern.

It’s one I’m super excited about as I actually started it in late spring. Then it need complete re-working and I had already decided to leave it for next holiday season when a chat with a friend inspired me to take another look and I’m oh so glad I did. I completely love this finished version. Say hello to the Glow Throw Pillow! If you’re as excited as me, you can grab your ad-free printer friendly pdf with both graphs and written instructions for right and left-handed crocheters on LoveCrafts or Etsy right now!

Photo by Meggie Oxley

This make it the official start of my Glow Collection. The Glow Garland was the first released and this was designed to coordinate perfectly. I plan on adding more to this collection in future. Now is your perfect time to get a start on some new decor while there’s still time before Christmas and then add more next year. I will be aiming to release more of the collection earlier in the year to have more time to get them done ahead.

For this year however, both this cushion cover and the garland work up quick so it’s not too late to refresh your home’s holiday look!

Photo by Meggie Oxley

Just like the Glow Garland, this is easy to adapt to suit your colour scheme, simply use your preferred colour instead of the blue. If you really want to personalize it, you could even play with any or all of the bulb base, cord and background colours. I did the back of my cushion in the same white as the front, but I was very tempted to use the blue from the bulb (note: if you choose to do this, it will take more yarn than indicated for the bulb colour).

Can I just take a second to gush about how much I love the garland and throw pillow together?

Photo by Meggie Oxley

I’m so looking forward to where expanding this collection will take me. Throw blanket? Tree skirt? Bib? Stocking? Placemat? Who knows! If you have an idea you’d love to see added, let me know in the comments. I’d love to add more themed Christmas collections too, so if you have an idea for another them I’d love to hear that too!

I create what I love, and hopefully other people will love it too. But I also love hearing other people’s ideas and sometimes that cues something in my brain and bring out something amazing I never would have thought possible (more in that vein coming when I do the post for the Panda Blanket from my Cozy Critter Collection). So any ideas you have, I’d love to hear!

I’m including the yardage and charts for free below. Grab your ad-free printer friendly pdf with both graphs and written instructions for right and left-handed crocheters on LoveCrafts or Etsy.


Yarn: Worsted (4) weight. I used (and list) Paintbox Yarns Simply Aran colours

Background (C) – Champagne White  approx. 402 yards

Bulb (S) – Sailor Blue  approx 100 yards

Grey (G) – Stormy Grey  approx 50 yards

Cord (B) – Pure Black   approx 50 yards

Hook: 4.5mm I like Clover Amour

Right-handed Charts (keep scrolling for left-handed)

front

back (make 2. Overlap by 6 tiles and join to front with sc around)

Left-handed Charts

front

back (make 2. Overlap by 6 tiles and join to front with sc around)


Deck the halls. And the tree.

“It’s beginning to look a lot like Christmas…” at least it is over here thanks to my newest pattern, the Glow Garland. I hung this Christmas (or holiday, but it’s Christmas here so that’s what I’ll use) light garland up as soon as I finished it (end of August), when everyone was asleep to see if anyone would notice in the morning. I guess I’m sneakier than Santa because only 1 of three saw it without me pointing it out! The 1.5 year old.

Get the ad-free, printer friendly pattern with links to my stitch tutorials now on LoveCrafts or Etsy. Or keep reading for more of my take on it and some ideas on customizing it.

Photos by Meggie Oxley

Maybe a little early for Christmas decorations. I finally took it down yesterday, but I’m not putting it far away! I think its going to be one of the family favourites, and I’m sure I’m going to have to make more! I would love to use it on our tree. WE have an artificial tree that’s white and a little iridescent, with white lights. Most of our decorations fit one or both of two categories, “modern” Christmas brights (hot pink, lime green, turquoise, orange, gold, bright purple…), or some kind of toy (biplane, dinosaur, a certain potato face…). A little bit like a modernized traditional tree, but in almost neon. I think with some careful colour selecting, it would fit right in!

I likely won’t be able to do it for this year, I have what seems like a million works in progress coming your way over fall and winter, and trust me, you’re going to want them all release this year as much as I do, so my focus will be there this year. But I am totally already thinking of doing this in tree length in spring or summer for next year.

If you have more time than I do or are better at planning it than I am (not hard to beat me. It’s almost 10pm on a Friday and here I am writing Thursday’s post!), it’s so easy to fit it in before Christmas still. Each bulb or base takes just minutes, so you can throw a colour or two in your bag and keep making one or two in that colour wherever you are as you have a few minutes. There’s very little sewing (just the width of 4 stitches on each bulb), the rest of the time you can just crochet or chain.

Photo by Meggie Oxley

The white highlight on each bulb is optional, you could choose to keep working in the bulb colour instead of changing colours, but I love the highlight and the extra bit of life it brings. As one of my testers noted (and I do remind now in the pattern), just make sure you orient all the bulbs with the highlight on the same side before attaching bulb bases onto them. Its also worth another check before attaching each to the cord.

I’ve written the pattern with worsted weight yarn in mind, however you could use any weight yarn you want for a different look. Try a dainty set in dk. Use crochet thread to make light strings for a tiny village, Lace weight or fingering for earrings, or to edge a cushion, playmates or table runner. Super bulky for a more cartoon feel, or to appliqué in a spiral around a tree skirt. You can literally use this anywhere.

This is also a perfect way to really show your sense of personal style and the colours you use at Christmas. I used the typical main four colours used in strings of coloured lights, I would have added orange too but I didn’t have any. Maybe you’re into the blush pink, rose gold, gold and white Christmas decor (blush and rose gold bulbs made holding a metallic thread with the yarn, gold bases and gold or white cord anyone?), or shades of blue is your thing. Maybe clear/white lights are the only kind you use,, a soft banana cream or other off white would still show the white highlight beautifully and be set off by the grey bases and a grey cord. The sky’s the limit folks! This also make a great stash/scrap busting project, I’d just advise checking you’re using the same weight yarn throughout. Unless you’re into the look of it with different sizes, that would also totally suit some decor.

I (we. It’s a whole house thing) LOVE decorating for Christmas. I don’t love the idea of hauling out from under the stairs and digging though the boxes of Christmas stuff alone once the kids are in bed while (or with them while they’re awake for that matter), to do a whole set up for a few pictures, to put it all away again. By myself. So there will be more photos coming when big A is done the crazy long shifts.

In the meantime, as always, I’d LOVE to see your finished versions! Use hashtags #theglowgarland and #makewithmeggie to make sure I see them.

Get the ad-free, printer friendly pattern with links to my stitch tutorials now on LoveCrafts or Etsy.


The cherry on top

Have you joined the faux-fur pom-pom team? I’ll admit I love them. They’re fun, a little luxurious, and there’s a colour to match any hat or toque. It was probably inevitable I’d eventually crochet my own. Here’s the Go Faux It pom-pom. Keep reading for more on one of my new favourite things, or head straight to LoveCrafts or Etsy to snag the pattern.

Photo by Meggie Oxley

Have you made your own or do you buy them?

There’s nothing wrong with buying them, and a lot of makers sell them and it’s great to support local makers. But I also can’t resist a DIY idea, especially if it brings the cost of my making down.

My husband (big A) and I made some a couple years ago from some faux-fur fabric we bought. They weren’t difficult, just a bit messy (have you tried cutting faux-fur?) and I have a good sized piece of that faux-fur still sotting around time prove I have hard time getting inspired to make them.

When I first started seeing the faux-fur yarn in stores, I’ll admit I thought it was strange and had no idea what anyone would want to do with it (spoiler alert: I kind of love it now. Expect more with it!). Even if that’s still what you think, I’ve got a winner of a use for it for you.

Crochet your own faux-fur pom-poms! It’s simple and quick. You’ll wonder why you didn’t do it earlier! They may not be exactly like some of those super luxe ones we’ve seen with the long long fur, but they still look great!

So go grab your favorite colour of faux-fur yarn, whether it’s bright or nuetral, grab the pattern and your 10 mm hook and you can keep making them for yourself on demand all winter. Or go pom-pom crazy use the whole skein in one night. You’ll want to.

I used Loops and Threads Yarn Fur because that’s what my local Micheal’s had. Lion Brand Yarn has one called Go For Faux I’ve heard great things about too. They are both 6 weight yarns, so you could even change it up and just use a 6 weight yarn for a puffy ball type hat topper.

As always, I used one of my Clover Anour hooks. I used a 10 mm, and although gauge is not important, if you know you crochet loosely, you may want to use one size smaller so the stuffing doesn’t show.

That’s enough y’all from me since you’re probably just waiting for me to stop so you can get started! Grab the pattern on LoveCrafts or Etsy and get making with me!


Blow me away…

Autumn here is windy. First windy, then windy with beautifully coloured swirling leaves, then just grey, dirty and windy. What’s a girl to do? Well this one embraces those fall layers (pumpkin spice helps too. Chai anyone?) and that includes my neck! Whether you’re a scarf, infinity scarf (with or without the twist!), or a cowl person, I’ve found you new go-to this fall, the Wind Drift.

Photos by Meggie Oxley

(If you just can’t wait to get started, you can find the pattern on Etsy here, and LoveCrafts here. Did you know you can get 20% off all my patterns in Etsy during their Labor Day Weekend Slat Sept 3 -7? Use code labordaysale2020)

I’m convinced the reason so many of us love fall is in how the rich colours and all the layers just feel like this luxurious excess in contrast to the simple skin and salt (if you’re lucky enough to live near the ocean) of summer. Who doesn’t love to feel cozy, and let’s face it, cozy and sweaty aren’t friends.

It’s easy to find me wearing a lightweight scarf of some kind indoors even. It’s a part of my outfit today! When it gets cold, I’ll be happy to remove any layers that remind me I was just outside freezing thanks, but that day’s not today. It’s a fashion statement, its part of who I am!

So it better not be too hot, because I will sit inside wearing it and drinking something hot. I can’t be the only one. My scarf better breathe a little.

Which brings me back to the Wind Drift.

Photo by Meggie Oxley

Its got that chunky style to it without being heavy and dare I say it, almost lacy. Even a bold colour palette will look on-trend and sophisticated in this versatile pattern. Go subtle with a solid or tonal pick, ease through some changes with some variegated yarn, or add some definition and make it striped.

Photo by Meggie Oxley

I’ve also included instructions to make it as a scarf, infinity scarf, or cowl. So whatever floats your boat, it’s there!

The magic is using aa worsted weight yarn with what is proportionally an oversized hook. For the striped cowl, I used Caron x Pantone Bamboo (now discontinued), for the infinity scarf I used Lion Brand Yarn Landscapes in the Mountain Range Colourway. Both I would consider to be on the heavier side of worsted. I love the softeness and drape of both as well. And I can’t get enough of how theft sheen and slight slub of the roving texture in Landscapes works in this pattern.

Photo by Meggie Oxley

And of course as usual, I highly recommend the Clover Amour hook. Get the 15mm here, or grab the set in a case here. (As an Amazon Associate I earn from qualifying purchases). I crochet some long hours sometimes and they help with a pain free experience. I also crochet faster using them compared to other hooks.

Back to the pattern. It’s a very simple, easily memorizable pattern that a beginner could have success with as well, each stitch is so large you can really see all the parts of the stitch,

Stay warm out there folks! And let your Wind Drift help you do it. Grab your ad-free, printer friendly pattern with chart included on LoveCrafts here or Etsy here and embrace the season change. And don’t forget the code labordaysale2020 for 20% my patterns during Etsy’s Labor Day weekend sale.

P.S. – if you’re a maker already in or thinking about gift giving mode, this makes a great gift!


Steal my heart

While talking with a friend who crochets, we decided I should come up with a pattern that we decided she would work up as an experiment. So since she was making it, I let her choose what the finished item would be and the theme of it. I’m not giving out any more than that now (hint: read next week’s post) other than to say we loved it and it inspired the project I’m posting now.

The Bandit stroller blanket is draped over the branch of a tree in the park. It is a corner to corner blanket in grey and white with a raccoon face on it.
Photo by Meggie Oxley

This is the Bandit stroller blanket. (Not intended for night or other unsupervised sleep. **make with meggie does not support using blankets on an unsupervised sleeping child under the age of two**)

I still don’t quite know why a raccoon popped into my head but I’m so glad it did. I adore this little face so much! This little bandit has stolen my heart. And my daughter’s it seems. Whenever she sees the blanket she wants to claim it for her own.

A round toddler visible from about the knees down stands barefoot on the Bandit stroller blanket on the grass.  Part of her feet are just visible from under the off-white skirt with black stripes.
Photo by Meggie Oxley

Just look at those cute little toes enjoying the squishy blanket! I actually used a 5 bulky weight yarn for it because of the extra squish factor. Who doesn’t love a little extra squish?

I’ve been trying out a variety of Paintbox Yarns recently and this is their Simply Chunky. I loved working with it. It didn’t split on me and moved beautifully on the hook. It also comes in a huge range of colours which is always an advantage. I definitely rate it a “would use again”! Especially as it’s so affordable. If you’re buying the pattern through my LoveCrafts store, I believe they even make it easy to add the yarn in the listed amounts to your cart too. I also have the pattern on Etsy if that’s your jam.

Another advantage (besides the squish factor) of using 5 weight yarn is how fast the blanket works up. You really feel that sense of progress.

The Bandit stroller blanket lays spread on the grass. It is shades of grey and white with a raccoon face in the middle.
Photo by Meggie Oxley

If this little critter has stolen your heart too, you’ll love the announcement I’m making along with next week’s pattern. (Hint: there will be more raccoons!)

As I always do for c2c projects, I have both right and left-handed charts and written instructions. Find both in your download when you get it on LoveCrafts or Etsy. Both charts will be posted below. I just have to leave you with one more picture because I can’t get enough.

The Bandit stroller blanket is draped on a very large rock.
Photo by Meggie Oxley

And as always, show off your finished work! make sure I see it by tagging @makewithmeggie on Instagram and twitter and use #banditblanket to make sure I see. I might even share it! And don’t be shy to come back and share the love in the comments on any or all of my platforms, you can share, like, subscribe, follow, etc while you’re there!


As an Amazon Associate I earn from qualifying purchases.

Materials

Yarn: 5 (Bulky) weight
Colours listed are for Paintbox Simply Chunky 5 balls Stormy Grey (approx. 745 yards)
1 ball Slate Grey (approx. 149 yards)
1 ball Champagne White (approx. 149 yards)

Any 5 weight yarn that you can match to gauge can be substituted.

Hook: 6.5 mm (K) I like Clover Amour. Get it here, or get the set with a case here.

Notions: scissors
darning needle to weave ends

stitch marker to mark right side (RS)

Gauge

Working a 6 tile x 6 tile squad, the middle 4 tiles in each direction measure 3.5”

Size

Finished size is about 30” x 35”

Not intended for night or other unsupervised sleep. **make with meggie does not support using blankets on an unsupervised sleeping child under the age of two**

Right-handed Chart

Left-handed Chart


That lazy hazy feeling

You just can’t beat that laid-back vibe the end of summer has. Embrace it and carry it on into fall with this week’s new pattern, the Breezy Days girls pullover.

Photos by MAK

It’s relaxed and comfy fit is everything that childhood should be. Pair it with cut-off shorts for an easy summer look, or move into fall or even winter and spring with a pair or leggings and keep that “barefoot feeling”.

Keep reading for all the details, or if you can’t wait to get started, get the ad-free, printer friendly pattern with links to tutorials now on Etsy here, or LoveCrafts here.

I originally started this with my (at the time) 16 month old daughter in mind. Then somehow, as happens, I had the bottom of a much too large for her sweater worked up. I used my (very patient with me) almost 5 year old son as a body to fit to instead as I finished and called on a friend for a girl to fit it! Then of course I couldn’t resist the sister element, so I made it again in another size. And I still wanted one for my daughter so I made it again in another size. All this to say I’ve made it three times personally, and am still not bored of it and still love it!

It’s made from the bottom up, starting right from the bottom ribbing which is then slipstitched together before starting on the body. If you follow the pattern in working over all your tails as you go, you should only have 2 ends to weave in at the end. One at each sleeve cuff.

It’s also designed with minimal seaming in mind, with only a short seams at the top of each shoulder. It’s very easy which is perfect for the end of summer heat we’re experiencing here as it won’t sap all your brain power and is still a very enjoyable make.

Photo by Meggie Oxley

I used Loops and Threads Flecks (acrylic and polyester blend, worsted weight) for the first two I made. Totally worth using if you can get your hands on it through Michaels. I wasn’t able to order it online, but I was able to phone into the store and have some put aside so pick up and paying was as quick as possible. I used the colours Seafoam, and Pink Galore, but all the colours available in it are just as ice-creamy dreamy.

Photo by Meggie Oxley

Knowing this yarn might not always be the easiest for everyone to get their hands on (outside North America especially), I also chose a yarn available on LoveCrafts. I thought I’d try it in a natural fibre as well, and I stumbled on Hoooked Eucalyps.

Photo by Meggie Oxley

I am so hooked on this yarn (no pun intended). It’s a beautifully smooth and soft yarn made of Eucalyptus with incredible drape. It has some weight to it, like a cotton does, but the garment itself doesn’t feel heavy. This is the yarn I used in the end for my daughter’s sweater and she loves it. She gets excited every time she sees it and then wants to wear it. It’s actually a DK weight according to LoveCrafts, but I was able to meet gauge with it, so forged ahead and it came out wonderfully.

Any heavier DK to worsted weight yarn that you can meet gauge with should work for this. For best results, choose something that will drape nicely. Another acrylic I imagine would work well would be Caron Simply Soft but I haven’t tried it myself. I also had testers use Women’s Institute Soft & Smooth, and Stallion 8-ply (I can’t speak to the suitability personally as I haven’t seen either yarn myself, but my testers were happy).

Get the ad-free, printer friendly pattern with links to tutorials now on Etsy here, or LoveCrafts here.

Don’t forget to post your finished pieces with #lavenderlemonadeplacemat and #makewithmeggie. Tag me (@makewithmeggie) so I can see them! I may even share it!


No tricks here.

So I may have created a new obsession. Time will tell. After last week’s c2c placemat, I had to do another one! And I feel like there’s going to be more… (holiday themes perhaps?)

This week it’s the Illusion Placemat, with three interlocking diamonds that remind me of those wood and metal puzzles where you have to try get the pieces apart. Or sometimes of those illustrations with all the stairs that somehow work and don’t work all at once. A crochet project and brain teaser all in one. You’re welcome!

Photos by Meggie Oxley

You can buy the full ad-free, printer friendly pattern with chart and written instructions for both right and left-handed crocheters on Etsy here, and on Lovecrafts here. Keep reading for more and to view the charts.

As much as I love other types of crochet too (texture please!), I have to admit with the sudden heat we have here and not being able to go out anywhere all day with two kids under 5, by the time my crochet time rolls around, I’ve often only wanted to use enough of my brain to work the colour changes if c2c and not worry about different stitches. I’m sure I’m not alone in this recently!

I do have some more c2c stuff coming soon (Christmas anybody? But not placemats. Yet. ), but also a few other things I’m really excited to share with you so keep your eyes peeled, stay tuned and all that. Make it easier by signing up for emails! I only email once a week, and since I’ve been posting a new pattern each week recently they’ve all been exciting emails.

Now back to this week!

Photo by Meggie Oxley

The interest in this one come more from the sharp lines of the pattern, rather than from the colour play, however it would be great worked up in high contrast colours as well. It would also be stunning in nuetrals (maybe I want a set like that now).

For a variation, you could even use only two colours, working all three diamonds in the same colour. It would lose some of the interlocking aspect but would still be lovely.

The pattern is simple enough to work on any home with the right colours. A white background and two shades of blue for the diamonds would be a classic.

This was actually a very fun project to make. The diagonal lines lend themselves very well to c2c crochet and although there’s a section in the middle with quite a few colour changes, it flew by without feeling intense.

This would be a great project for someone who has tried c2c and wants to begin to step up the number of colour changes in a row. Even a confident beginner could do this (the first c2c project I tried had 13 colour changes in one row!) as its great to practice keeping all your working yarns workable (not one big nest!) because the project isn’t large.

And again, like last week’s placemat, it easily works with a vase or other centre display or on top of an end or night table.

Photo by Meggie Oxley

I’m including both right and left-handed charts below. To get both charts as well as written instructions for each hand, get the ad-free printer friendly pdf on Etsy click here and Lovecrafts here.

Don’t forget to post your finished pieces with #lavenderlemonadeplacemat and #makewithmeggie. Tag me (@makewithmeggie) so I can see them! I may even share it!


Materials

Yarn: 4 (worsted) weight cotton.  I used Paintbox Recycled Cotton in Tea Dance, Jam, and Steel Blue

Tea Dance (pink in sample) – approx 140 yards

Jam (berry in sample) – approx 50 yards

Steel Blue (grey in sample) – approx 35 yards

Hook: 4.5mm I like Clover Amour. Get it here, or a set with a case here. (As an Amazon Associate I earn from qualifying purchases)

Notions: scissors

    needle to weave ends, I like these (As an Amazon Associate I earn from qualifying purchases.)

    stitch marker to mark right side (RS) I use these. (As an Amazon Associate I earn from qualifying purchases)

Gauge

Working a 6 tile x 6 tile square, the middle 4 tiles in each direction measure 2.5”

Size

Finished size is about 14” x 11.5”

Right-handed Chart

Design by Meggie Oxley of make with meggie

Left-handed Chart

Design by Meggie Oxley of make with meggie